Components for a Wireless Charger (Wireless Charger Kit-K012)
| Category: | Bambu Lab |
|---|---|
| The item has been sold out… | |


Information
The Wireless Charger Kit includes all the non-3D printed parts to build a fully functional A1 mini wireless charger or Airforce Command Headquarters wireless charger. To complete the job, you will need to download the model files and print the parts on a 3D printer.
| Compatible models | Creators | Model links |
| A1 mini wireless charger | Bambu Lab | A1 mini wireless charger |
| Airforce Command Headquarters | 30 3D Print | Airforce Command Headquarters |
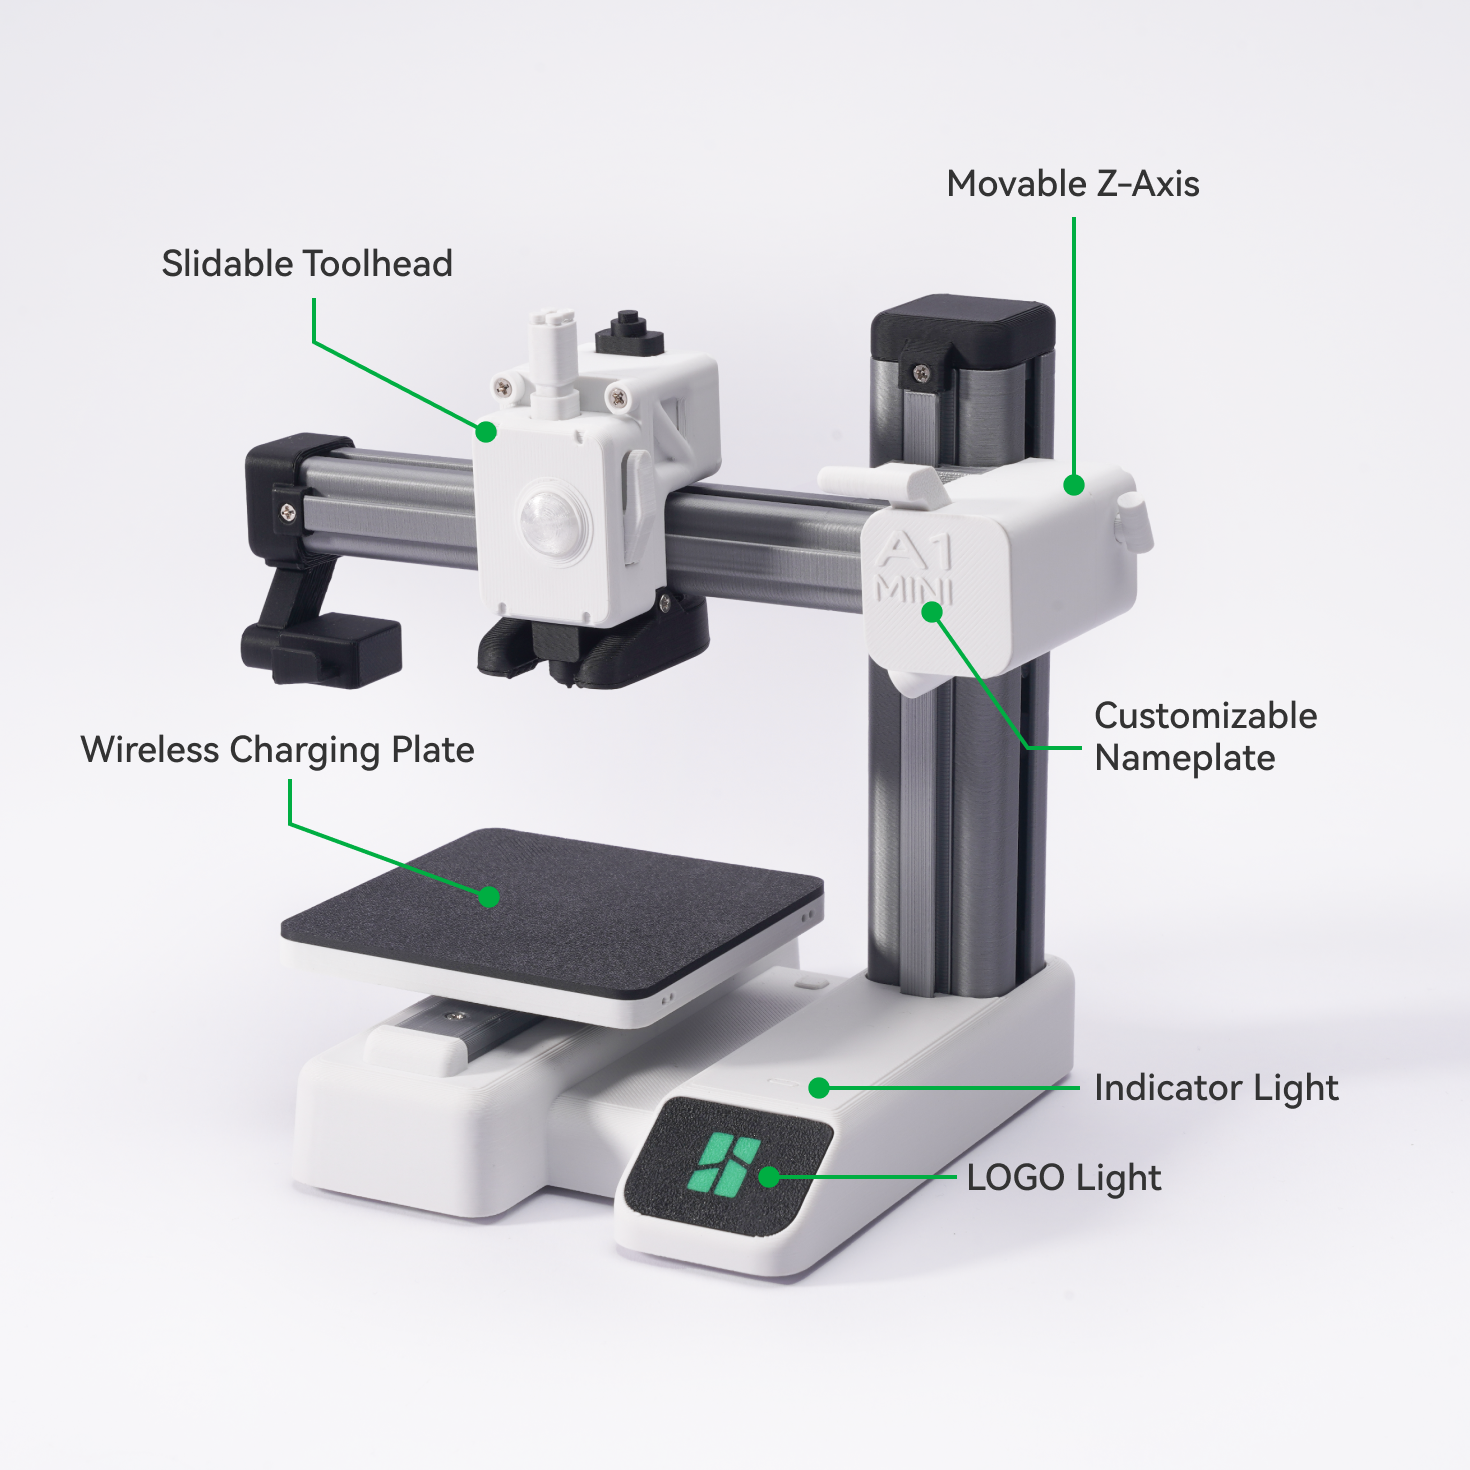
A1 mini wireless charger
The A1 mini wireless charger is here! We designed a cute wireless charger model based on the appearance of our A1 mini 3D printer.
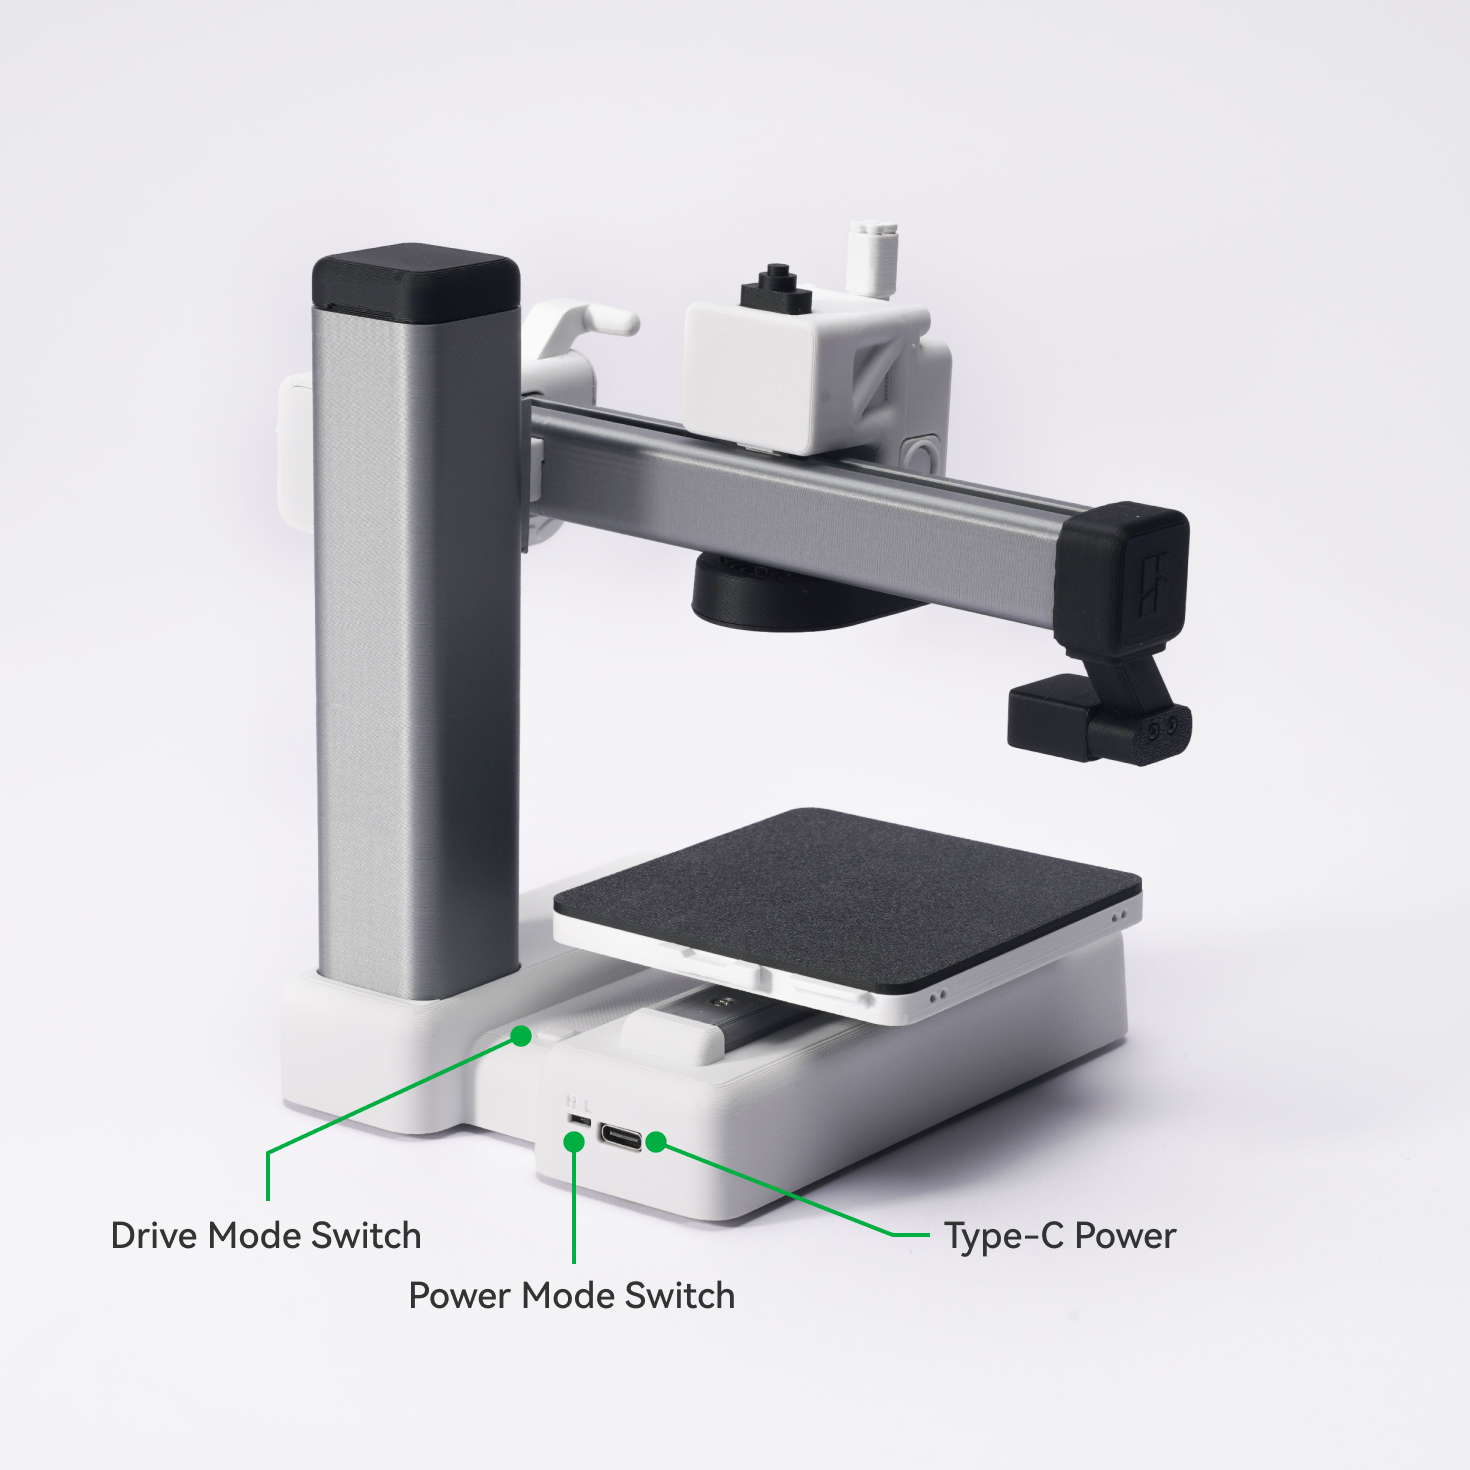
• Simply connect the Type-C cable to the wireless charger and turn it on. • Simply connect the Type-C cable to the wireless charger and turn it on. • Simply connect the Type-C cable to the wireless charger and turn it on. Then place your phone on the wireless charging board and start the charging process. Then place your phone on the wireless charging board and start the charging process. Then place your phone on the wireless charging board and start the charging process.
• Once charging begins, the Z-axis will simulate the printing process by moving up and down for one cycle. During this time, the LOGO light will light up.
• To adapt to different phones and filaments, we specially designed two power modes (high/low) to prevent the phone from overheating and thermal deflection of printed parts. • To adapt to different phones and filaments, we specially designed two power modes (high/low) to prevent the phone from overheating and thermal deflection of printed parts. • To adapt to different phones and filaments, we specially designed two power modes (high/low) to prevent the phone from overheating and thermal deflection of printed parts.
• We also designed two different drive modes (Mode 1 and Mode 2) for the A1 mini wireless charger to accommodate the varying levels of friction generated during Z-axis movement. (This friction is caused by differences in filament materials and print tolerances) • We also designed two different drive modes (Mode 1 and Mode 2) for the A1 mini wireless charger to accommodate the varying levels of friction generated during Z-axis movement. (This friction is caused by differences in filament materials and print tolerances) • We also designed two different drive modes (Mode 1 and Mode 2) for the A1 mini wireless charger to accommodate the varying levels of friction generated during Z-axis movement. (This friction is caused by differences in filament materials and print tolerances)
Drive Mode Specifications
• The A1 mini wireless charger is only compatible with Modes 1, 2, and 7. Do not leave it in Modes 3, 4, 5, and 6 for an extended period of time. This precaution is necessary to prevent possible damage to the model.
• All drive modes are arranged in a fixed cyclic order (1 to 7) . Each press of the drive mode switch switches the wireless charger to the next mode in the order.
Mode 1 (default mode)
Lights: Highlight for 10 seconds and then stays lit at normal brightness
Motor: Back and forth movement for one cycle
Compatible model: A1 mini wireless charger
Mode 2
Lights: Highlight for 10 seconds and then stays lit at normal brightness
Motor: Reciprocating motion for one cycle with more power (to accommodate the varying levels of friction generated during Z-axis motion)
Compatible model: A1 Mini Wireless Charger
Mode 3
Lights: Continuous breathing light
Motor: Continuous back and forth movement
Compatible model: Airforce Command Headquarters
Mode 4
Lights: Continuous breathing light
Motor: Continuous unidirectional movement
Compatible model: Airforce Command Headquarters
Mode 5
Lights: Breathing light for 10 seconds
Motor: Back and forth movement for 10 seconds
Compatible model: Airforce Command Headquarters
Mode 6
Lights: Breathing light for 10 seconds
Motor: Unidirectional movement for 10 seconds
Compatible model: Airforce Command Headquarters
Mode 7
Lights: OFF
Motor: OFF
Compatible model: A1 mini wireless charger, Airforce Command Headquarters
| Lights | Motor | Compatible model | |
| Mode 1 | Highlight for 10 seconds and then stays lit at normal brightness | Back and forth movement for one cycle | A1 mini wireless charger |
| Mode 2 | Highlight for 10 seconds and then stays lit at normal brightness | Movement back and forth for one cycle with increased power | A1 mini wireless charger |
| Mode 3 | Continuous breathing light | Continuous back and forth movement | Airforce Command Headquarters |
| Mode 4 | Continuous breathing light | Continuous unidirectional movement | Airforce Command Headquarters |
| Mode 5 | Breathing light for 10 seconds | Back and forth movement for 10 seconds | Airforce Command Headquarters |
| Mode 6 | Breathing light for 10 seconds | Unidirectional movement for 10 seconds | Airforce Command Headquarters |
| Mode 7 | OFF | OFF | A1 mini wireless charger, Airforce Command Headquarters |
Recommended filaments

Installation
Recommended installation tools: PH screwdriver, transparent glue, wire cutter, needle-nose side cutters, tweezers, adhesive.
In the box
| Item number | Item name | Quantity |
| 1 | N20 gear motor | 1 |
| 2 | Circuit board and coil | 1 |
| 3 | Switching board | 1 |
| 4 | Wire LED light | 10 (8 short 2 long) |
| 5 | Connecting wire | 3 (1 short 2 long) |
| 6 | Power Splitter Board | 2 |
| 7 | Foam foot pad | 4 |
| 8 | M1.6x3 CHCS | 2 |
| 9 | M2x5 CHTS | 7 |
| 10 | M2x6 CHTS | 10 |
| 11 | M2x12 CHTS | 15 |
| 12 | M2x25 CHTS | 6 |
| 13 | M1.6x16 BHCS | 14 |
| 14 | M1.5x30 stainless steel dowel | 7 |
| 15 | Light guide rod | 2 |
Product specifications
| Package weight | 72 g | Package size | 100*70*35 mm | Charging power | 5W-15W |